4. Shaper Origin and Laser Cutter#
Shaper Origin#
Preparation and Setup#
1. Workspace Preparation#
I ensured a stable, clean workspace with a spoil board beneath the workpiece to protect the table during cuts.
2. Wood Thickness#
I used a wood piece with at least 9mm thickness for stability.
3. Securing the Workpiece#
I applied double-sided tape to keep the wood steady against the table and screwed it in to ensure stability throughout the process. I made sure to place the screws outside the design area to avoid interference.
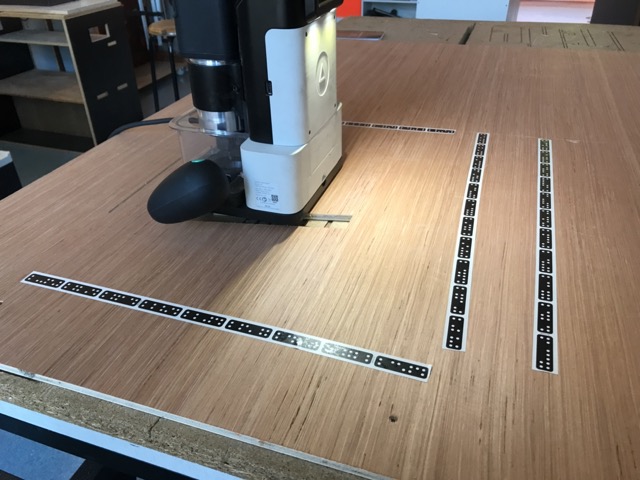
4. Installation and Placement of ShaperTape#
I applied ShaperTape strips evenly on the workpiece surface, around 3 inches apart, ensuring they were on the same plane as the cutting surface. I placed the ShaperTape around the cutting area borders so that the Shaper Origin could effectively visualize the workspace. I ensured the camera could see at least two rows of ShaperTape at all times.
5. Change Router Bits#
5.1. Removing the Spindle#
I unplugged the SM1 Spindle and used the 4mm T-handle hex wrench to loosen the spindle mount bolt, lifting the spindle out.
5.2. Change the Bit#
I pressed the collet lock and used the provided 19mm wrench to loosen the collet nut. I inserted the desired router bit and tightened the collet nut. The maximum cutter diameter was 1 inch (25.4mm).
5.3. Bit Size#
I used a 3mm bit for detailed cuts
Reinstall the Spindle I slid the spindle back into the mount and tightened it.
Dust Management#
I connected the Shaper Origin to a vaccum which has a hole designated for it.
Starting with the Shaper Origin#
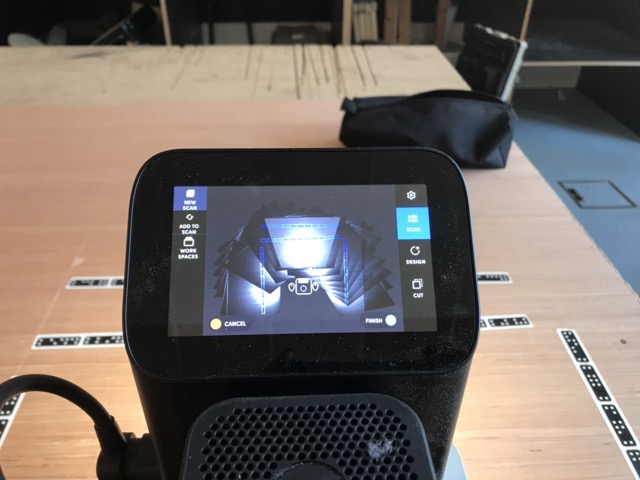
1. Scan the Workspace#
I used the built-in camera to scan the workspace covered with ShaperTape, allowing the Shaper Origin to create a digital map of the workspace for precision cuts.
3. Load or Create Design#
I imported my design file (in SVG format) using a USB flash drive
Alternatively, I created a simple design directly on the Shaper Origin using the touchscreen interface or import my design via Wi-Fi
4. Position and Adjust the Design#
I used the touchscreen to position my design on the mapped workspace, adjusting the size, rotation, and placement as needed.
During the tutorial, I used a design of a chair leg with holes for pegs. I made sure to understand the design well to avoid errors during cutting.
5. Setting Cutting Depth#
Adjust Depth: I set the cutting depth to 3mm per pass for the 9mm thick wood, requiring three passes to cut through.
Cutting Process#
I used the spindle switch to turn it on, as it did not start automatically for safety.
The Svg file used had a plain outline design for me to decide the cut styles but you can you can preformat the cut styles based on your design:
Cut styles based on the color codes#
Interior Cut: Black stroke with white fill.

Exterior Cut: Black stroke with black fill.

On-line Cut: Gray stroke.

Pocketing Cut: Gray fill.

Guide Cut: Blue stroke or fill.
I manually guided the tool, and it made automatic adjustments to keep me on the path.
I mistakenly cut both the outline and holes three times, resulting in cutting through unintended areas, emphasizing the importance of understanding my design.
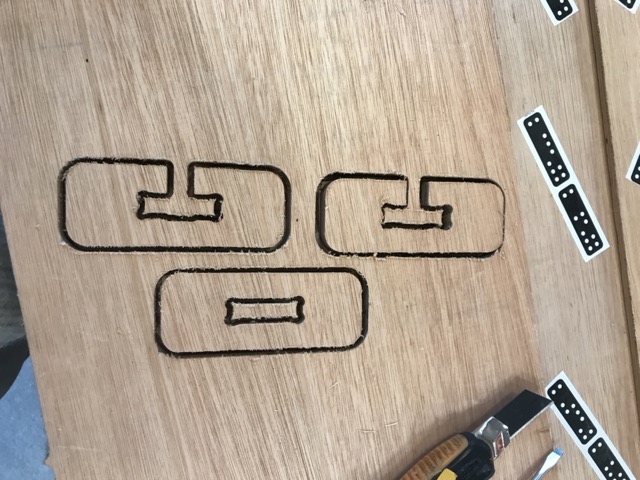
Project#
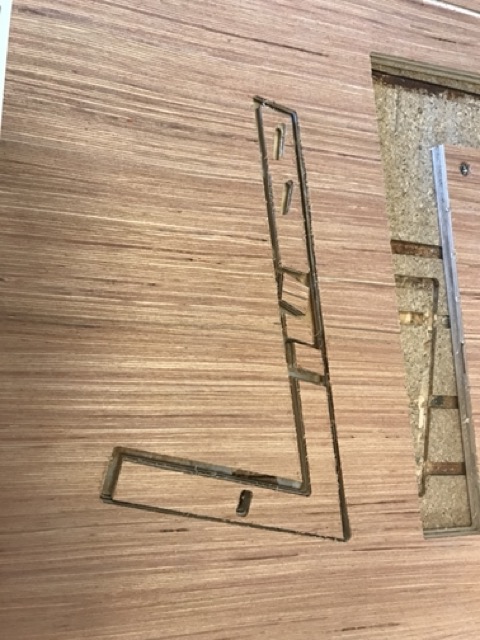
Design Source#
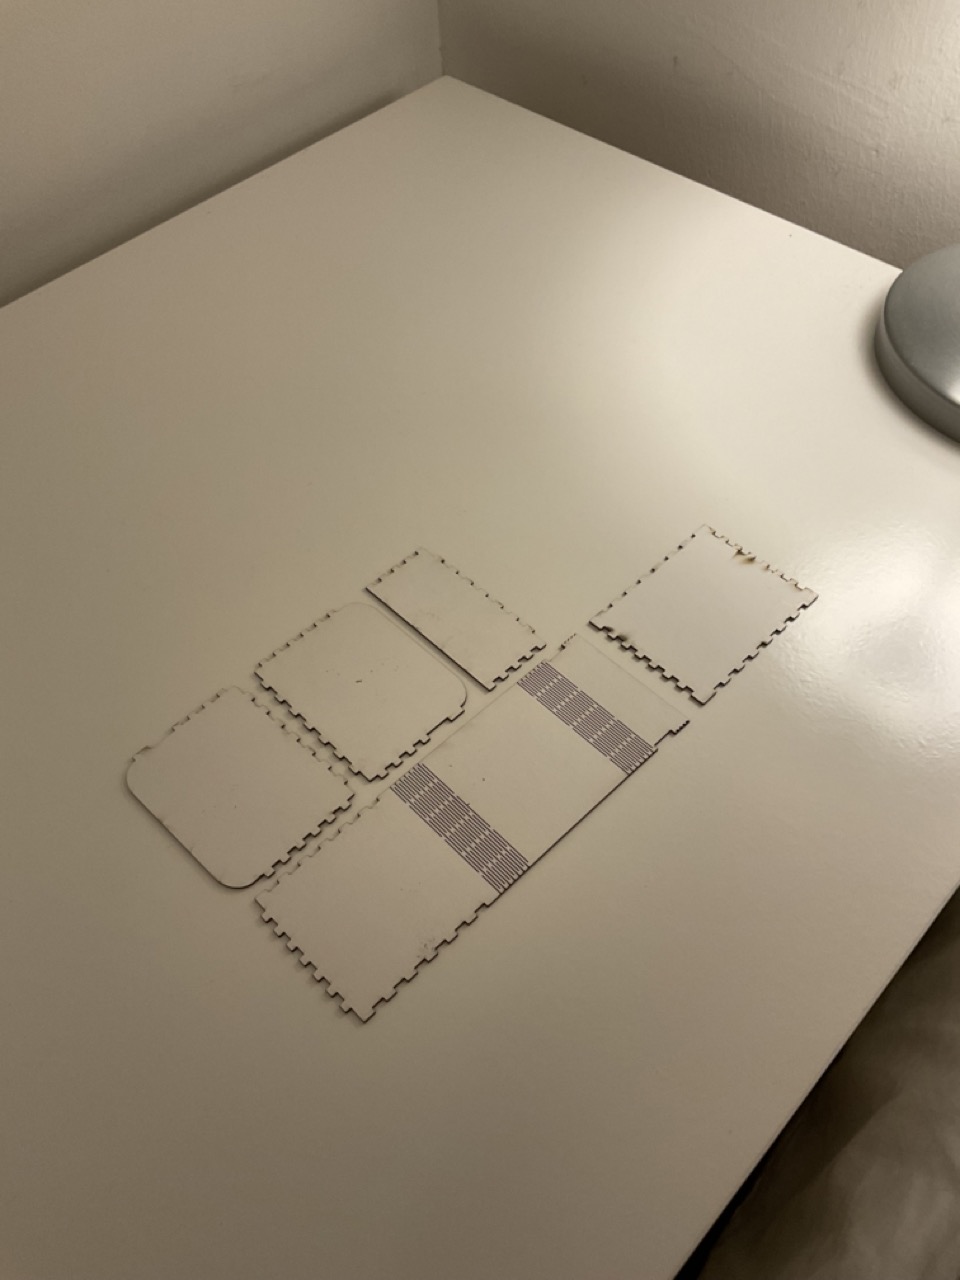
I used a simple design, Puzzle I found on ShaperHub by BrianEkins under the BY-NC-SA 4.0 License.
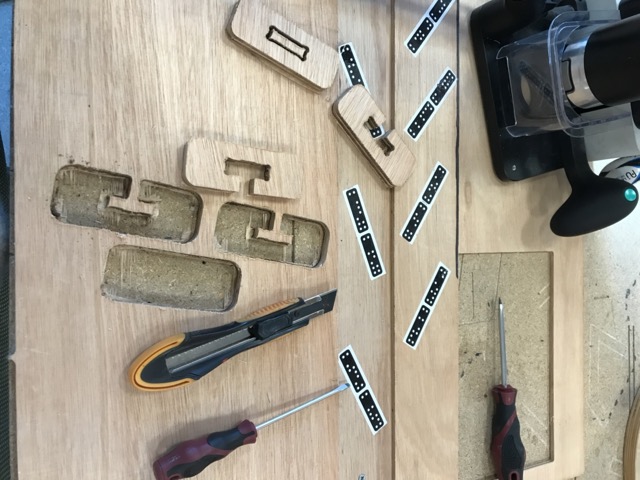
Initially, I thought this project would be quick and simple, as it only has 3 pieces. However, since I was using 13mm thick wood, I had to make four passes to get through it completely.
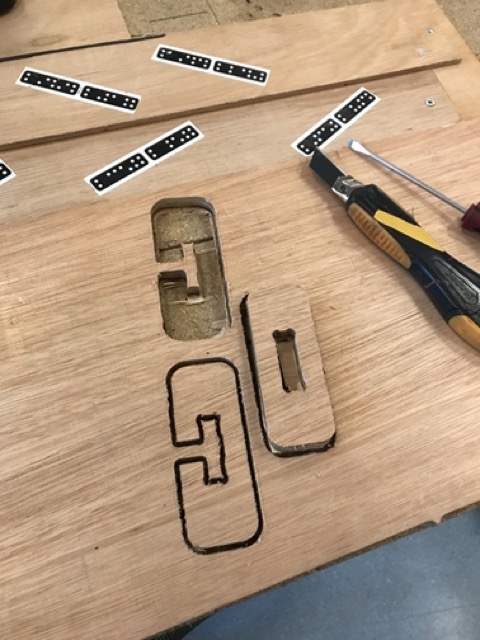
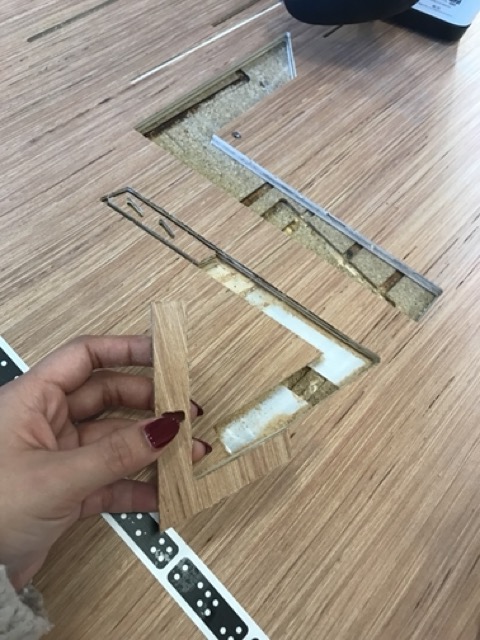
Midway through the cutting process, I realized I hadn’t checked if the design required a specific wood thickness, which was important since the pieces needed to fit through holes. I was concerned the wood might be too thick, which would prevent it from fitting.
I left 1mm of the material untouched because I hadn’t taped the wood down on the work area. I then had to manually cut the last 1mm and sand the excess afterward.
Thankfully, after measuring my wood, it turned out to be approximately similar to the creator’s dimensions, and the pieces fit perfectly. This experience taught me to always check the material specifications for compatibility with the design.
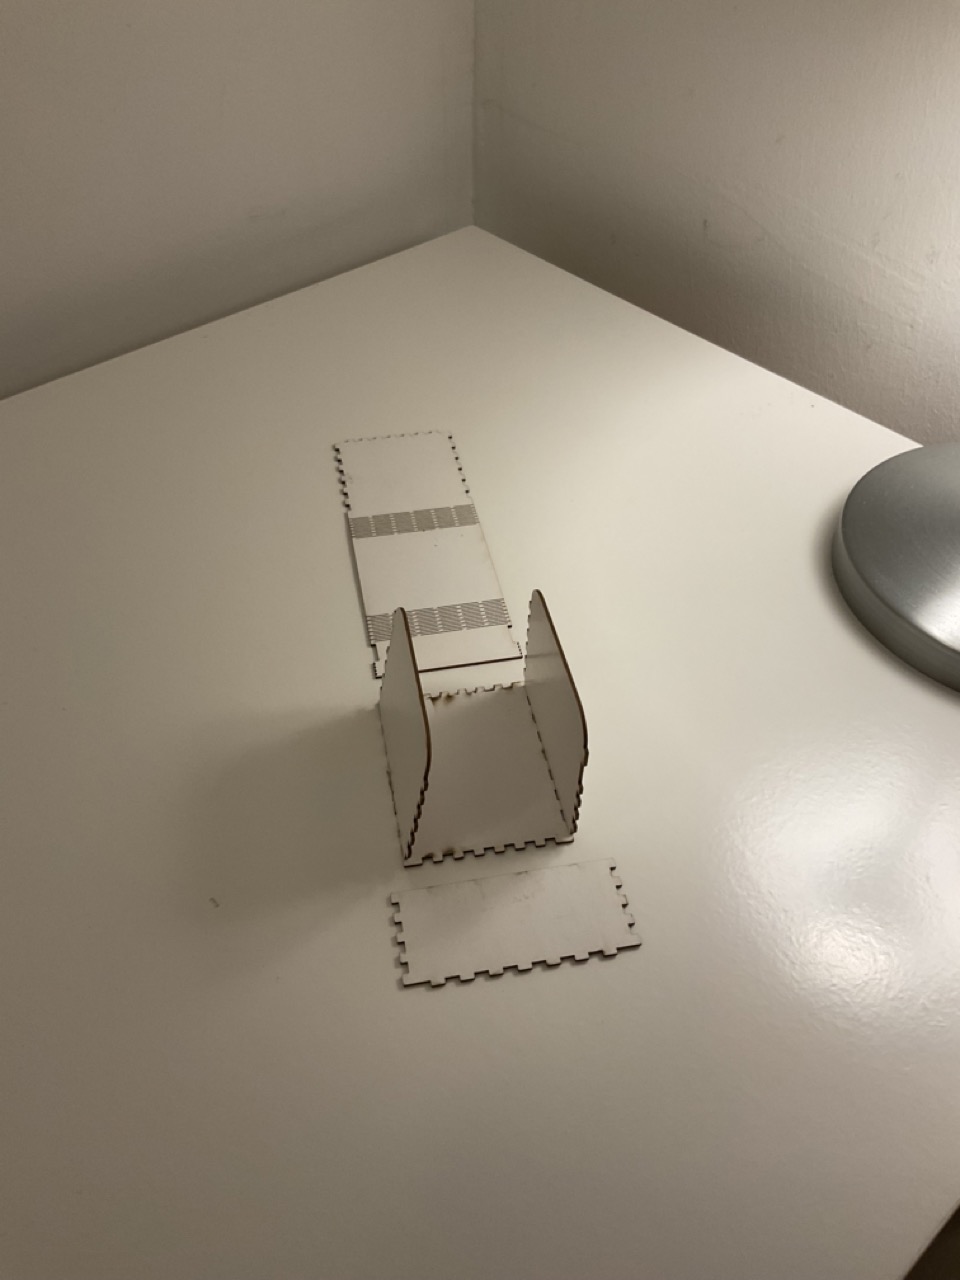
Here is the finished product

Lessons Learned#
Indicate Cut Type#
I need to clearly indicate in my design whether a cut should be inside, outside, or on the line.
Understand the Design#
I make sure to know my design well, including the sequence of cuts, thickness of the wood, and depth settings.
Measure Accurately#
I measure the wood thickness accurately to ensure the correct number of passes and avoid damaging the material or bit.
Laser Cutter#
Learning Inkscape#
During the first half of the tutorial, we learned how to use Inkscape and the importance of setting color codes for the laser cutter based on the type of cut desired. Different colors were used to distinguish between cutting, engraving, and scoring lines, allowing the machine to execute each type of cut correctly. I made sure to also save the file in SVG format
Overview of machine#
During this session , I was introduces to two different laser cutting machines.
The Epilog is a professional-grade laser cutter known for its precision and ease of use, ideal for engraving and cutting a wide range of materials.
he Lasersaur is an open-source laser cutter, more customizable as the focus for the Lasersaur was adjusted manually by moving the laser head to the correct height above the material, ensuring optimal focus for cutting or engraving.
Project#
For this Project I used the Epilog laser cutting machine
 I found a website that provides a box template generator where I could change different parameters to get the desired size: Boxes Generator. The generator is available under the GNU General Public License Version 3 (29 June 2007). I chose a box with rounded corners and a hinge from.
1. Initial Parameters#
Initially, I tried to use the original parameters:
x: 100 mm (inner width)
y: 100 mm (inner depth)
h: 100 mm (inner height)
Radius: 15 mm (rounded corners)
Latch Size: 8 mm
2. Adjustment in Epilog#
When I opened the design in Epilog, it was a bit too large, so I resized it through the software to fit the material properly.
Material Testing and Parameter Settings
3. Material Testing#
Initially, I performed tests on the material. Although there were some sample settings available, I decided to test them myself since the material I used was slightly different. I would recommend testing if your material is not standard.
4. Material Type#
I used a thin cardboard-like material for my laser cutter project.
5. Laser Settings#
After deciding on the parameters, I used the following settings:
Speed: 30%
Power: 70%
6. Auto-Focus Setting#
I made sure to set the Auto-Focus to plunger for accurate focus adjustment.
7. Split by Color#
I clicked on “Split by: Color” in the software to differentiate between cutting and engraving layers.
8. Process Type#
process type correctly: “Engrave” for the layers to be engraved and “Vector” for the layers that needed to be cut out.
9. Monitor the Job#
I monitored the process carefully to ensure there were no issues such as material burning or shifting. The Epilog laser cutter had built-in safety features, but it was still necessary to watch for any signs of fire.
10.Cutting Quality#
The laser cutter made precise cuts, and I adjusted the speed to ensure that the edges were clean and free from excessive charring. For engraving, I reduced the power setting to create a detailed and subtle effect on the material surface.
Final Result#
Unfortunately, the end result of my box did not have the correct parameters after adjusting them through the Epilog software, which made it impossible to assemble the box properly.
Second Try on the Project#
After the first test with the Epilog didn’t work, I decided to conduct another test using the Lasersaur, which uses a different software and requires manual adjustments since it doesn’t have a plunger option like the Epilog.
1. Design Update#
For this project, I aimed to create a treasure box-like shape, and I adjusted the parameters as follows:
x: 75 mm (inner width)
y: 50 mm (inner depth)
h: 75 mm (inner height)
Radius: 25 mm (corner radius)
Latch Size: 8 mm (size of latch)
2. Material#
I used wood approximately 3 mm thick, which was different from the previous material. Due to the new material type, I also had to adjust the laser settings.
3. Laser Settings#
I followed a sample for the settings and hoped for the best to avoid wasting material:
4. Cutting Settings#
Speed: 65%
Power: 600%
5. Engraving Settings#
Speed: 10%
Power: 400%
For engraving, I ensured to change the settings and made sure there was a path and fill. If not set properly, the machine would only create an outline rather than a filled engraving.

Final Result#
This part was a success since I was able to put them together without gluing them meaning I had the right dimensions

Lessons Learned#
Burn Test#
Make sure to always do a burn test on your material to ensure the parameters are correct.
Material Settings#
Properly setting the laser power, speed, and frequency is crucial to achieving clean cuts and preventing burns.
Focus Adjustment#
Correct focus ensures the laser beam is concentrated, resulting in precise cuts.
Monitoring During Operation#
Even with automated features, constant monitoring is necessary to prevent mishaps and maintain quality.
Adjusting Design Size#
You can adjust the placement of your final design, but never adjust the size as it could alter the parameters. Either separate your pieces and cut them one by one or adjust them through Inkscape.
Shaper VS Laser Cutter#
| Type | Material Limitations | Mobility | Cut Depth Control |
|---|---|---|---|
| Handheld CNC Router | Mostly wood, some plastics | Portable, handheld | Multiple passes required for depth |
| Fixed Bed Laser Cutter | Wood, acrylic, paper, and some metals | Fixed machine, requires a designated space | Set by laser power and speed |
The Shaper Origin was ideal for projects that required portability and hands-on adjustment, providing flexibility but requiring more user skill to maintain accuracy.
The Laser Cutter offered more automated precision and was better for complex cuts and engraving on a wide range of materials with minimal manual intervention.
Personally, I preferred using the Shaper Origin as I felt more integrated in maneuvering the machine, rather than just placing the material in the machine. However, the laser cutter was an easier and faster option, especially when the material was not too thick.